The Printable Bug

Perhaps it is well known to many of you out there, but I have only recently discovered the trend of “printables” out there on the wide world web. From cupcake toppers to patriotic 4th of July quotes to cute coloring pages, whatever the style and whatever the purpose, you can download them online and your printer will spit them out. Though I’m not necessarily downloading every single one out there (I’m not so cute as to bake cupcakes, much less top them with anything so adorable, nor am I so patriotic as to display anything about the US of A), I think the general idea is pretty sweet.

So, as inspired partly by this beautiful printable (which is the first one that caught my eye), I have made and am now posting my first self-made printable in honor of my graduation from failed to novice gardener. You can read about my new, very exciting success in my last post, Brown Thumb Vanquished!

Here is the printable as a blank slate. Click on the words Just Keep Growing to download for free and color yourself!

Just Keep Growing Image


Here I am coloring it. Now you all know that I let my fingernails get to this shameless point. *Sigh*photo (60)

photo (62)

And here it is when I was finished with it:

photo (61)

 Again, if you have a green thumb to celebrate, or want a reminder to inner self … or just like coloring …  you can click on the words Just Keep Growing to download for free and color yourself! Heads up – It goes on 11×17 inch paper.

Brown Thumb Vanquished!

Dear World,

I have not written in quite a long time! I do apologize, but I promise I have been storing up a nice post or two. The one I am most pleased by is my recent discovery that I have finally conquered my previously persistent gardening curse.

Any time I have had a plant, it has wound up sadly leaving this world. Its departure was always slow and mysterious. I would watch it slowly drift away, trying all sorts of things to make it better – more water, less water, more sun, less sun – always bumbling about ignorantly in the futile race to save the plant. (Don’t tell anyone … I have even killed a succulent.)

Things began to change when a couple of months ago, after a long hiatus without living things within my four walls, I decided to give it another go.

I gave myself three rules:

1. Do your research. Read up on plants from as many sources as you can to find which ones you think have the best shot in your dim apartment.

2. One plant at a time. I told myself, “Start with one. If you can keep it healthy for at least a month, then you can move on to the next, and the next, and slowly grow your collection” … or “urban garden,” as my research has taught me is the trendy thing to say.

3. Put it where you won’t forget to water it! For this, that meant in plain sight in my apartment, or outside the front door, where I will see it when walking in. If I were to start out on the back patio, I wouldn’t see them, and therefore wouldn’t think of them, and therefore they would die.

These, as we might say in teaching, were my effort to “set myself up for success.”

My first baby: Phillippa, the rubber plant.

Can you see her? She is the only actual living plant in the picture.

IMG_1315

I need to get a better picture of her. She is quite lovely, with burgundy tips at the end of her stalks, like pink paper all rolled up.  When a new leaf sprouts, those burgundy stalks unroll to reveal a fragile, translucent light green leaf (also a little wrinkly … I guess like a real newborn anything). And I can proudly say my rubber plant has not only survived, but grown at least 4 new leaves and even a new baby stalk at the base, which continues to grow.

Second project: The herb garden


Having declared the Phillippa as one point for me, I abided by Rule #2, decided to for my second planty project … 
IMG_1588


I have long dreamed of having a “salsa garden,” in which I would grow all the ingredients necessary to make a homemade salsa. While I don’t quite have that, I did learn that it was possible to grow several herbs inside an apartment — even one that doesn’t get that much direct sunlight. THANK YOU, GARDENISTA for inspiring me! If you are also interested in getting some green in your 425 square foot life, see this very helpful post to learn which herbs have a shot in the shade. You might be surprised!

So one weekend Daniel and I went to a local nursery and picked up some peppermint, oregano, basil, and sweet margoram (I didn’t know what it was, but it smelled nice, and at the very least I thought it might make a nice tea). Then, when Daniel was out of town, and I was left to my own whims, I bought several more at our local co-op: more basil, rosemary, spearmint, and even a tomato plant … just for fun. Then at Whole Foods: the cilantro I had been truly hunting for and a couple of lavender plants.

Here are the “before” and “one week after” pictures.

Oh, it just makes me want to kiss them!

IMG_1567  IMG_1588

An INCREDIBLE secret, I discovered along the way, also with the help of my new garden coaches at Gardenista.com was in this post: How to water any potted plant. So far since reading it, I have not under-watered nor overwatered any plant! (*Cheering from the bleachers* … or maybe this is more of a *knock on wood* moment). If you also suffer from my watering woes, this article will change your life.

Another of the great things is, that now that I have plants indoors that I’m used to watering, I can have them on the back porch (breaking rule #3), because watering is already in my everyday awareness. Plus, the weather has been so lovely recently (somehow Austin is fending off the horrid Central Texas heat further and further into Spring), we have been sitting out on our patio more often.

What do you think, friends? Can I officially say my brown thumb is vanquished? If I am right, it will be a great thing for plants everywhere … or maybe just in my general vicinity!

I have great plans for my current plants and plants-to-be. Here is to more green posts to come…


Moral of the Day

Dark chocolate (we’re talkin’ 85%+) is a frequent treat in our cupboards.

This morning (yes, morning, don’t judge) Daniel asked me if I would like a square of our Blackout dark chocolate. As it is delicious, I accepted.

It turns out, after one square … I really wanted another. So I proposed we each have another, but Daniel hesitated. I suppose his conscience began whispering, “It’s morning” on his shoulder just about then. But rather than leave myself at the mercy of his unpredictable answer, I swiped the foil-wrapped goodness off the counter, placed one square in his hand and the other one in mine.

However, along with that piece of chocolate, I offered a piece of sage advice:

“Never give a girl a piece of chocolate unless you’re prepared to give her another.” 

This little nugget of wisdom, or “moral of the day” inspired two pieces of art in our household today…

Inspired Artwork #1) This drawing by moi.

IMG_1343

Inspired Artwork #2) This message, by Daniel, on our fridge with those wonderful magnetic letters.

IMG_1337

… which then got rearranged to form this:

IMG_1349

Fun in the apartment this spring break!

Fun with Magnetic Letters

It has been a long time since my last post!

There was a project dry spell for a while. Then when I got started again, like a person given a glass of water after a terrible thirst, I just drank and drank (arted and crafted) without stopping to breathe (post).

Here is one of my recent projects. No genius here. As a teacher I had a ton of colorful magnetic letters, that it turns out I really don’t need anymore … at least not in the numbers I had them.

IMG_1252

I had the thought to spray paint them, and was so proud of my unique idea … until I found about a million pins on Pinterest of people doing the same.

However, the big “in” thing is gold. And I dig it. Nothing against gold. But it wasn’t really what I wanted for our kitchen. So I just went black.

So still unbeknownst to the apartment building owner (whew), I took the letters out on a big sheet of cardboard to paint them such.

IMG_1256

I cleared the rest of the clutter off our icy friend to leave it just simple black and white. Two of each letter stay on the fridge for easy access, and the rest go back in the green tub to avoid cluttering the fridge too much. Turns out these letters are a lot of fun!

Daniel’s and my routine has become the following:

I write a message. Later I walk in to find Daniel has changed around the letters to spell something entirely different (which may or may not make sense). Here are just a few examples…

IMG_1270IMG_1274

Good morning” becomes “Goon dorming.”

IMG_1275

IMG_1277

What’s for dinner?” becomes “Finned thor wars.”

IMG_1281

 IMG_1286   IMG_1287

Hello Handsome” becomes “No sad hell home” or “Mend shoal hole.”

IMG_1294 IMG_1295

So spiky” (Don’t ask. We’ve been watching a British show.) becomes “OK Pissy.”

IMG_1312 IMG_1335

and “Weekend fun” becomes “We need funk.” Same thing, really.

It turns out “I’m too bootylicious” has too many Os and Is to re-spell anything. Here are some of our attempts:

IMG_1288

“I’m too bootylicious” becomes …

IMG_1289 IMG_1290 IMG_1291 IMG_1292

And finally, success!

IMG_1293

“Oily tooticious mob.” Indeed.

And then sometimes they just get left to be nice.

IMG_1279

Six No-Cost Projects When its DIY-or-the-Phone-Bill

I’ve been going a little crazy the last couple weeks with my list of projects (pictured below) that I want to work on around the apartment, yet I have no dinero!

project list

So what do you do when Verizon demands its payment, but you need some creativity in your life? Well, who doesn’t enjoy a challenge? Here are my top 6 totally free projects. And by “top” I mean recent. Please share those of yours that are actually tip-top! See if you can guess which one is (kind of) a joke.

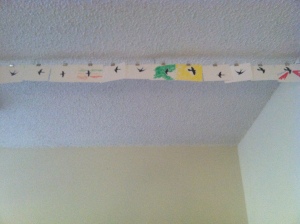
1. Bring nature inside for above-the-head bed art

branch headboard

For this I literally walked around the neighborhood searching for branches. I had something entirely different in mind, but the thing about searching for fallen branches is its entirely different from being able to order exactly what you want from Target. What I ended up with I liked better than my original idea anyway.

How to:

1. Find branches you like.

2. Arrange them how you like on another surface.

3. Use a level to help you find their spot on the wall.

4. Drive in a single nail at the thickest place in the branch (where it won’t split too badly).

5. Stand back and say “Voila!” (Yes, out loud.)

2. Rearrange books and safari animals on the coffee table

Coffee Table

Coffee Table_Under glass

Coffee Table_Elephant

Coffee Table_Tiger

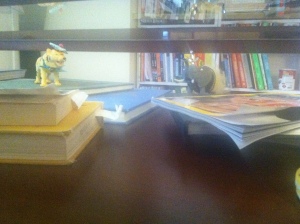
We got this coffee table JUST for the storage. There’s a layer for books and drawers underneath for the unsightlies. I added more books, and display my two friends – the golfing tiger and ballerina elephant I bought from a sweet 13-year-old girl at an arts and crafts market in San Antonio.

How-to:

1. Get some books you already have. Or just keep the ones out that you have out all the time anyway.

2. Find creative very nice 13-year-old girl who makes awesome fancy toy animals and sells them at her mom’s art stand.

3. Put ’em all together.

3. Paint chip art

Paint chip art

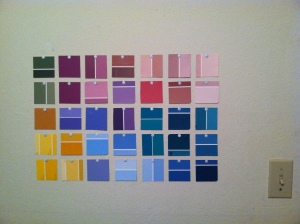
I must admit that paint chip collecting has been a tick of mine, so to speak, every time I enter a home improvement store, even before I knew of all these paint chip art projects all over Pinterest these days. I had a bunch in one of my craft baskets, pulled them out, and just did whatever came to me. I’ve seen many beautiful projects online nowadays though. Here is one of my favorites.

How-to:

1. Collect paint chips.

2. Cut into 2×2 pieces.

3. Arrange how you want on a surface.

4. Transfer them to the wall with some basic tacks.

Or just do your own thing with them. You can’t really go wrong with paint chips as long as you get colors that make you feel good.

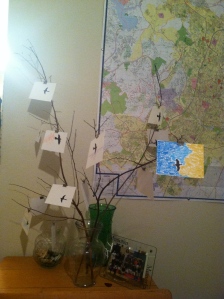
4. Print out some bird friends

IMG_1056

I made these birds about three years as inspired by an Anthropologie (their displays are better than their clothes!) display I had seen in college, and put my own spin on it. I already had them so they certainly were free, but if you have a printer, card stock, and optionally some pastels, then you’re in business!

I used to have these all on one string facing one direction so you would see a line of them as you walked through the door, but it never quite worked. So I flipped them out to face the other way and put them on my Christmas tree branches for a new look.

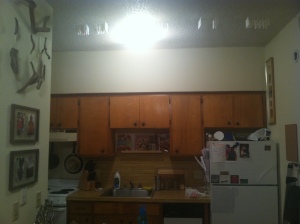
(crappy) BEFORE (picture):
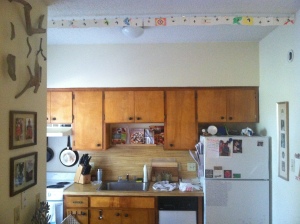
IMG_1049

AFTER:

IMG_1055

IMG_1110

How-to:

1. Google “bird silhouettes” and pick out your favorites.

2. Put them randomly into a Word doc.

3. Print onto cardstock.

4. Cut them out on uniform pieces.

5. Optionally draw some random designs on some with pastels, watercolor, colored pencil, whatever you like.

6. Hang them with alligator clips onto fishing line.

5. Hang something you already have

heart and sign

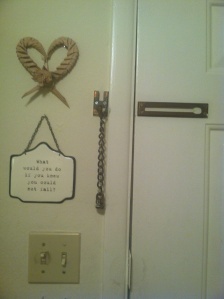
I had this hanging quote sign from a rental house a couple years ago that the tenants before (also Teach for America alums) had left behind. It might be an upcoming project for a re-do itself.

“What would you do if you knew you could not fail?”

The heart thingamajig was a “gift” from a small boy in Granada, Nicaragua made out of folded banana tree leaves. Its just been sitting around until I spotted a place for it and just did it!

6. Give your SO a haircut

So clearly he was in need of a good cut. (I’m so sorry, Daniel.) And if you can’t gussy up your apartment itself, why not gussy up its residents?

IMG_1129

The first time I cut Daniel’s hair I was 18 or so, and was so thrilled/shocked he agreed to let me do it, he spent something like 2 hours sitting on a stool in the kitchen while I worked on it, because I wasn’t about to screw it up!

These days I don’t take quite that long, but I’m still not very speedy. The question in this situation is … is this nice haircut due to my hunger for projects … or was it that same hunger that led to my neglecting his locks and letting him he end up in that Beatle-like state in the first place? Chicken … or egg?

IMG_1137

If you can do this item #6 just before Valentine’s Day like I did, you can have the added benefit of a sharp-looking date as well. 🙂

Daniel_haircut

How to:

1. Grab a comb, a glass of water, and a pair of sharp scissors. (I literally use our kitchen scissors because we are that by-the-seat-of-our pants, so really any pair will do.)

2. Say a prayer.

3. Get to work (and don’t let him see the concern on your face as you stop to examine your progress).

Dear Plexiglass, You Made My Day

Is there anyone else out there with a piece of art they adore that has some awkward measurements that don’t fit in ANY frame, but you don’t have the money to buy a custom frame … or the skills to make your own?

That is the story of me and this great print, Violeiros, by Brazilian printmaker José Miguel. I found it at lovely Tesoros Trading Company on South Congress for a pretty reasonable price for a piece of art that you love. You might have noticed it in my last post, laying on the chest beside the sofa like the lost piece of art it was when it was replaced by the frame collage.

This piece of art has caused me a good amount of distress, especially when I first bought it, couldn’t wait to hang it, and found that not even the mothership of home stores, IKEA, didn’t have a frame that would fit it. So about 9 months after hanging it squeezed between two swaths of wood boards, I decided to hang it with a DIY plexiglass frame. The bathroom wall was the only wall left that was JUST the right size for it.

So I followed a combination of instructions I found online, which I can no longer bring back up in my search! So here it goes at a summary how-to.

STEP 1: Measure your piece and buy plastic sheeting from the glass and plastics department at Lowe’s. Do NOT think you can do this at Home Depot, because they will not cut your plexiglass or plastic for you. Lowe’s will. For free.

When measuring, give yourself about 1.5 inches for margin around your artwork. This is enough space so you can drill holes for the screws, but small enough to not drown your art in a floating frame of nothingness.

STEP 2: Add to your shopping cart 4 screws, 4 nuts, 12 washers, picture-hanging wire, and a picture-hanging hook.

STEP 3: Place your art where you like between two sheets of the plastic. Perhaps tape it into place with tape on the back of the piece if it won’t damage it. Also tape the sheets of plastic together to prevent them from sliding when you drill the holds in the corner.

Image

STEP 4: If you notice the cloudy look of the plastic, it is due to the protective film on both sheets, which you will remove entirely at the end. For now, just peel off the corners of the film protecting the plastic so you can drill. Leave on the rest of it until you are ready to hang to prevent getting fingerprints all over it while you are handling it.

STEP 5: Measure where you will drill your holds — about 1 inch from each border.

STEP 6: Pick the right drill-bit for the size of your screws. Start small and work bigger until you find the right one. I held up my screw to my drill bits and picked one I thought would work, but erred on the small side. Daniel drilled, and we tested to see if the screw would make it through the hole. When it didn’t, we went 1/8 of an inch larger until we found the right one. Then drill your holes.

Image

STEP 7: Screw the plastic sheets together. You want a washer on the front, between the plastic sheets, and at the back before you screw the nut on the back.

STEP 8: Loosen the nut at the back slightly so you can wrap the wire to each of the top screws. Follow the instructions that come with it to make sure it is stable.

Image

STEP 9. Install the hook in the wall, peel off the rest of the protective film, hang the picture, and … voila!

Image

Image

And here’s a before and after for you…

BEFORE

Image

AFTER

Image

Frame Collage

Above our sofa – the focal point of our apartment, basically – we had two prints: an artsy map of Austin, and a print I love by a Brazilian printmaker, José Miguel. They are both odd measurements, so we just pinched them together between some wood pieces. But something was lacking.

Then, of course, I discovered and fell in love with younghouselove.com, and their frame collages inspired me to do my own.

I started by searching the apartment (this took about 30 seconds) for other frames I had that 1. had something in it I wasn’t crazy about, and 2. I could repurpose.

I took them all outside and spray painted them white to match some other frames I had bought at good old Target. (I kind of liked the look they left behind on the paper bags. If we had a larger place, I probably would have hung them up on their own as a piece of art.)

IMG_0923IMG_0927

I then went on the search for art, and discovered I had more art I thought I did. One discovery is that if you have hardbound books with the jackets still on, remove the jackets and you may be able to frame the jacket itself … or the book underneath might itself be a work of art, like Kevin Henkes’ Old Bear I picked up at a Half Price Books a while back. This is what was underneath:

Kevin Henkes

Or like the book jacket off of my personal favorite, The Giving Tree.

The Giving Tree

Or a nice birthday card, like this one:

Happy Birthday

Other unexpected art came from some vintage Spanish vocabulary cards I got for $1 apiece at Uncommon Objects (due to which, Austinites, we are thankful they were not $300. Uncommon Objects, we love you. Why don’t you love us back?) I framed some of them in semi-phrases…

Spanish Vocab Zoom Out    Spanish Vocab Zoom In

paired another one, la mitad, (the half) with one amazingly enthusiastic earring I bought while studying abroad in Rio (because I had lost the other), and put another one, el par, (the pair) with a pair of creatures Daniel and I had put on our Christmas tree a year ago, as you can see in my Recycled Christmas post.

La mitad    El par

Even a 3D object, like my grandmother’s trivet (I just had to look up that word) I realized could be art!

Gma Jessie

Anyway, Sherry and Peter have a great tip for arranging and hanging a frame collage. But I was impatient and had not paper to follow the instructions, so I just laid them out on our bed (the only flat surface big enough in our apartment) until I had the arrangement I wanted.

IMG_0928

I think just used my tape measure and level to hang the pictures one by one, starting from the center and working my way out. The before and after  pictures are pretty fun to look at!

IMG_0922

BEFORE: sans art

IMG_0939

AFTER: collage complete!

And if you’re wondering who illustrated this amazing postcard my wonderful friend Alyssa sent me …

Eric Carle

It was Eric Carle. (Yes, children’s literature is a theme. It would be for you, too, if it was your job to be obsessed with children’s books.)

And if you’re wondering who is so awesome that they would MAKE and WEAR a piñata costume for Halloween, then send out a card printed with a picture of herself with a heart for Valentines Day to her friends …

Carter

her name is Carter. And yes, she is as awesome as she looks.

And if you’re wondering what I’m doing with policemen in Mexico, I’ll tell you some time.

Mexico

And that is our frame collage! It makes our space so cozy when we walk in the door! I love it.

frame collage from door

Books Here, Books There, Books Everywhere!

By now we all are well aware that Anne and Daniel have a book problem. Daniel gave away a truckload in New Orleans to move here yet most of the belongings he brought were still books … Anne has a healthy set of books for herself, plus the set of children’s books I always used in my classroom (but don’t anymore as I have switched roles and no longer have my own classroom) … and … we keep buying more! Thus, storing our books in our apartment is a challenge!

When we started out, we just had piles. Piles in the kitchen, piles in the bedroom, piles in the … well, those are all our rooms.

Solution #1: We installed shelves I already had from IKEA. I love these shelves, because they have the rod and hooks that I have always used to hang dried flowers (now just green leafy plants). They are meant for a kitchen, but work great as shelves/decor.

Here they were in my last apartment:

OLYMPUS DIGITAL CAMERAHere they are in our current apartment:

IKEA bookshelves upclose

The plants have changed out. You’ll notice I painted my old place, despite being there for only one year (if you have ever lived on East Riverside, you understand why). Painting it back was a huge pain in the you-know-what. So rather than going for bright flowers, I just hung bunches of green stuff I got at Whole Foods.

dried plants

… with my favorite Frida diorama, from I-can’t-remember-where …

Frida

Now, with this kind of wall-mounted shelving unit, you do need to buy toggles to hang it so it won’t rip out the drywall of your rental, and you’ll need to patch it over before you move out. But they are both pretty easy to do, and if you’re looking for nice shelves, its relatively painless.

If its wall-mounted, you’ll want to watch the weight, too. Even though the toggles advertise a certain weight, I don’t want to risk it, so I space out the books with other nice odds and ends like the pictures show below…

globe an baseball

This way you can highlight nice things too, like Maya Angelou’s autobiography, an awesome mini-globe from Hobby Lobby, and the signed baseball I picked up for Daniel in Nicaragua (by Nicaraguan baseball player Denny Martinez).

big heart little minds        Eudora

And like my Eudora Welty photography book I picked up in Jackson, MS on an unforgettable photography road trip, a painting from a blind man in New Orleans, and the framed gift from an former student.

Solution #2: Wall-mount some more bookshelves, from IKEA, like these. 🙂 Again, watch the weight by spacing the books out with lighter fillers, like the snowflakes I put in a frame from our Christmas window decorations. Daniel installed these in our bedroom.

bedroom shelves

And if you still have more books?!?!

Solution #3: DIY bookshelves

Daniel and I realized we could utilize the space underneath the kitchen island that separates the kitchen area from the living area. So we took measurements, went to Home Depot, had them saw our wood pieces to the lengths we needed, and then annoyed our neighbors by hammering them together a couple of nice weekend afternoons.

They started plain pine, like this:

IMG_0957

Then when Daniel was out of town and I got bit by the craft bug (do you know his terror?!), I decoupaged the front with paper I already had around (from – YES! The Paper Source), so then they looked like this for a few weeks:

IMG_0958And I quickly realized I REALLY did not like the result. Thank you, Sherry and Peter (my heros from younghouselove.com), for letting me know its okay to try and fail. So then, I took them outside to spray paint the outsides white, taping newspaper on the inside of the shelves to keep the paint off them.

IMG_0959 IMG_0960

I wanted to create a backing, too, because to be able to see through a bookshelf to the bookshelf behind it and the kitchen beyond it contributed to the cluttered, busy feel. So, in classic pocket-change style, I tacked white poster board to the backs, like so:

IMG_0964

And they wound up looking like this:

IMG_0965

Because we had a number of books left, several of them heavy textbooks of Daniel’s that we didn’t want to put on the wall-mounted shelves, we reserved them for these guys here.

photo (39)

And then we have one more on the other side, next to our recycling bin, where we can keep the unsightly things like DVDs and office supplies:

office supply bookshelves

And HARK! We even have some extra space for our books yet to be purchased.

Closet Intervention

This is the story of a two closets gone astray. Instead of looking like orderly places where belts, pants, coats, and shoes have their place, they looked like the aftermath of a war zone. Piles of shoe rubble. Shirts thrown by some explosion out of their home and onto other furniture. Dresses shoved into place without care or attention.

Daniel and I each have a reach-in closet, Daniel’s about 2/3 the size of mine, but with one door entry versus my accordion door opening. But to make matters worse for him, I had baskets too big for their shelves full of all my craft and photo stuff crammed into the upper shelves, leaving his T-shirts and shoes to fend for themselves near the floor.

Here are our before and after pictures…

Image

Daniel’s Closet BEFORE (yikes)

ImageHere you see the casualties of a grenade. (Take note of the piles upon piles of children’s books in the background we had no place for. That will become important later.)

ImageDaniel’s closet AFTER (wiping sweat off brow)

This was accomplished merely with the help of a hanging sweater rack from Target (which is less than half the price of the cheapest at the Container Store). Also, notice that the upper shelf is now free for him to use, because I took back my sh** and organized it in my own closet!

Image

My closet BEFORE

Notice:

  • shoe rubble, lower right (also very difficult to get at beyond the low-hanging dresses, skirts, pants, etc.)
  • Purple boxes of mystery files, lower left, that have accumulated for the last 3 years
  • Sweatshirt sleeve hanging down disorderly from the highest shelf, because I can’t reach and literally throw things up there that I don’t wear that often

Image

Step 1: Clear out the unwanted … clothes to Goodwill. Unnecessary files in the trash and consolidated into (count ’em) ONE purple bin in the corner where you can’t see it.

Step 2: Hunt for 1.5 hours at the Container Store for bins to keep your crafts in that fit the very awkward measurements of closet shelves (and finally settle on transparent  shoeboxes). Stack one more shoe rack for extra shelving (though take note that Target has one identical for cheaper and I just chose this one because I couldn’t take fluorescent lighting and crowds any longer).

Step 3: Organize other storage spaces in apartment to maximize all space…

Image

Our toolboxes had been sitting out in the open in our bedroom for forever, because we had all sorts of cleaning supplies cluttering up under the kitchen sink. So … I moved that stuff into one consolidated basket under our bathroom sink, moved our toolboxes under the kitchen sink, and added two paper bags for our recycling that overflows out of our normal recycling bin.

Image

Under our bathroom sink

Here you can see those cleaning supplies in a basket (which I used to have my crafts in). The rest of our stuff got organized into the sides. And the things we didn’t use that often, I moved into cabinets in the bathroom, where we keep linens. (I also Goodwilled some things from there to make room. You need only one, not two, white bedspreads, correct?)

So this is the end of our organization story … for now. There is certainly lots of room for improvement, but for now I’m enjoying the resulting sanity and cleanliness of the open spaces.

Kitchen Inspiration

This is a before picture of our kitchen, which is directly across from our living room (which is also where we eat). Therefore, we look at these cabinets any time we are living in our apartment.

IMG_0411

This was taken before I actually moved all my stuff in, so in general it looks much different now, but the unfinished wood on the cabinets clashing with the fake wood laminate counters is getting to me nowadays. I’ve been debating whether I should ask for permission to either paint the cabinets or stain them at least. If I paint them, I would probably only be allowed to go with the same off-white color on the walls that they painted the bathroom cabinets. Any opinions on whether it would be better in a small space to go for blending the cabinets into the walls or staining them a richer color?

In the meantime I just stumbled across this website, though, which has me thinking about what I could do to fix them … and “spruce up” the kitchen in general. 

I’m considering #1: “Floor it,” but wondering whether it would just make an already small (very small) place seem choppy.

I’d love to do #2: Change the light. But I’m not sure about the technical how-to with the particular light installed in our place yet. If I figure it out, I will let you know!

I’m CRAZY about #7: “Bring the outside in.” A vertical wall-mounted herb garden would be a dream! Before I get it I will need to 1) save up to get this thing and 2) paint my thumb to be a bit more green.

I am contemplating #8: taking the doors off the cabinets. However, I’m not sure exposed storage would be the best for this small space. Not unless I could rearrange some things, maybe.

And perhaps #10 could be in the works eventually: non-stick papering the countertops to look like cork or granite or something. I found this video of its installation. Call me crazy, but maybe it could work … At Berlin Wallpaper, the marble roll is only $9 for a huge roll!

Then this website, Berlin Wallpaper, has other patterns as well – could I make my cabinets a whitewashed wood or something else different?