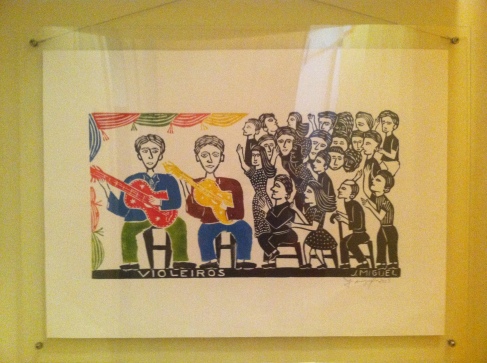
Is there anyone else out there with a piece of art they adore that has some awkward measurements that don’t fit in ANY frame, but you don’t have the money to buy a custom frame … or the skills to make your own?
That is the story of me and this great print, Violeiros, by Brazilian printmaker José Miguel. I found it at lovely Tesoros Trading Company on South Congress for a pretty reasonable price for a piece of art that you love. You might have noticed it in my last post, laying on the chest beside the sofa like the lost piece of art it was when it was replaced by the frame collage.
This piece of art has caused me a good amount of distress, especially when I first bought it, couldn’t wait to hang it, and found that not even the mothership of home stores, IKEA, didn’t have a frame that would fit it. So about 9 months after hanging it squeezed between two swaths of wood boards, I decided to hang it with a DIY plexiglass frame. The bathroom wall was the only wall left that was JUST the right size for it.
So I followed a combination of instructions I found online, which I can no longer bring back up in my search! So here it goes at a summary how-to.
STEP 1: Measure your piece and buy plastic sheeting from the glass and plastics department at Lowe’s. Do NOT think you can do this at Home Depot, because they will not cut your plexiglass or plastic for you. Lowe’s will. For free.
When measuring, give yourself about 1.5 inches for margin around your artwork. This is enough space so you can drill holes for the screws, but small enough to not drown your art in a floating frame of nothingness.
STEP 2: Add to your shopping cart 4 screws, 4 nuts, 12 washers, picture-hanging wire, and a picture-hanging hook.
STEP 3: Place your art where you like between two sheets of the plastic. Perhaps tape it into place with tape on the back of the piece if it won’t damage it. Also tape the sheets of plastic together to prevent them from sliding when you drill the holds in the corner.
STEP 4: If you notice the cloudy look of the plastic, it is due to the protective film on both sheets, which you will remove entirely at the end. For now, just peel off the corners of the film protecting the plastic so you can drill. Leave on the rest of it until you are ready to hang to prevent getting fingerprints all over it while you are handling it.
STEP 5: Measure where you will drill your holds — about 1 inch from each border.
STEP 6: Pick the right drill-bit for the size of your screws. Start small and work bigger until you find the right one. I held up my screw to my drill bits and picked one I thought would work, but erred on the small side. Daniel drilled, and we tested to see if the screw would make it through the hole. When it didn’t, we went 1/8 of an inch larger until we found the right one. Then drill your holes.
STEP 7: Screw the plastic sheets together. You want a washer on the front, between the plastic sheets, and at the back before you screw the nut on the back.
STEP 8: Loosen the nut at the back slightly so you can wrap the wire to each of the top screws. Follow the instructions that come with it to make sure it is stable.
STEP 9. Install the hook in the wall, peel off the rest of the protective film, hang the picture, and … voila!
And here’s a before and after for you…
BEFORE
AFTER


